/
Magento 1 Customer Configuration
Magento 1 Customer Configuration
- Igor Krasnykh (Unlicensed)
Owned by Igor Krasnykh (Unlicensed)
Last updated: Jun 09, 2018
This configuration area can be found in the Magento Admin Portal by navigating to "Salesforce (tab) > Integration Setup > Customer Configuration (page)"
STEP 1: General
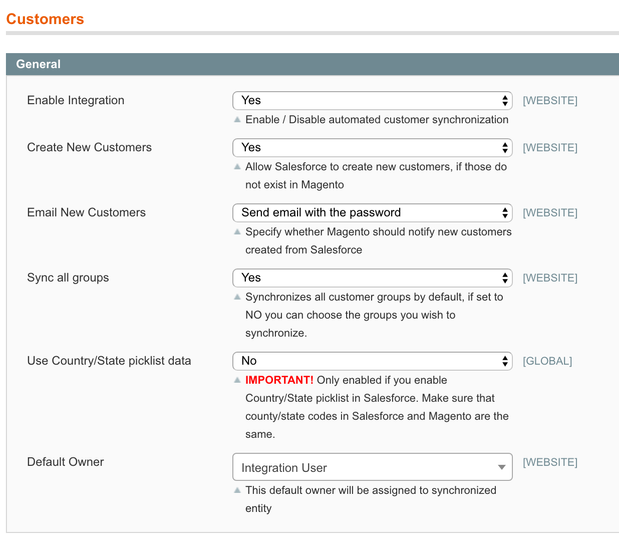
- Enable Integration - Controls if customers in Magento will be pushed into Salesforce automatically or not.
- Create New Customers - Allows Salesforce to create new Magento customers.
- Email New Customers - Controls the communication options for NEW Magneto customers created from Salesforce.
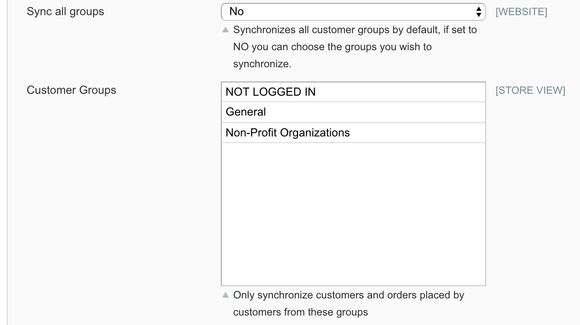
- Sync All Groups - Allows you to filter which customer groups should be synchronized with Salesforce. If you want ALL Magento customers to flow into Salesforce, leave this setting set to "Yes".
- Use Country/State picklists data
IMPORTANT: Only enable this setting if you have enabled Country/State picklists in Salesforce
- Default Owner - is an active Salesforce user who will be assigned to a newly created Salesforce Contact when Magento customer is synchronized and if that same customer does NOT exist in Salesforce.
STEP 2: Salesforce Accounts

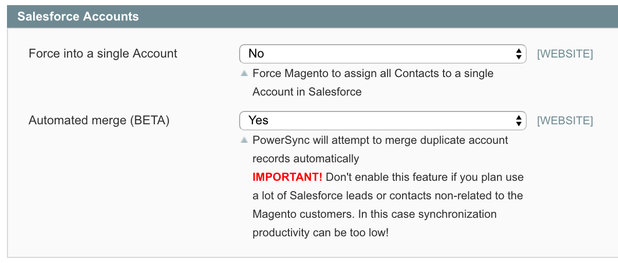
Force into a single Account - allows you to capture all NEW Contacts Magento creates under a single Salesforce Account.
This setting is used in a B2C space if Salesforce does NOT have Person Accounts feature activated.
- Automated merge - Allow PowerSync connector to automatically merge Salesforce Accounts that have the same name (case insensitive, exact match)
STEP 3: Salesforce Contacts

- Record Types
- Use B2B as default - Salesforce Account and Contact are used in the integration.
- Use B2C as default (available only when Person Accounts are enabled) - Only PersonAccounts will be created for every Magento customer.
- Use both B2B and B2C (available only when Person Accounts are enabled) - Magento will use smart logic to figure out if a PersonAccount in Salesforce will be created or an Account + Contact.
- Default B2B Account Type - if you have multiple Record Types for your Contacts, you can select the default Record Type the solution will use when creating new Contact in Salesforce.
- Use Person Accounts - this is a feature you have to request from Salesforce. If you don't know what this is, you probably don't have it enabled.
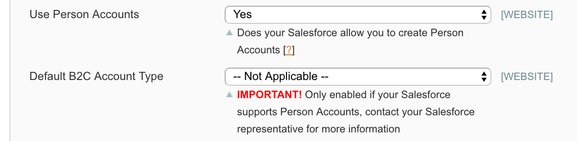
- Default B2C Account Type - if you have multiple Record Types for your PersonAccounts, you can select the default Record Type the solution will use when creating new PersonAccount in Salesforce.
- Contact Assignee - conditional logic to allow you to control how to assign a sales person to the customer in your organization.
- Automated merge - Allow PowerSync connector to automatically merge Salesforce Contacts based on the email address (case-insensitive)
STEP 4: Salesforce Leads
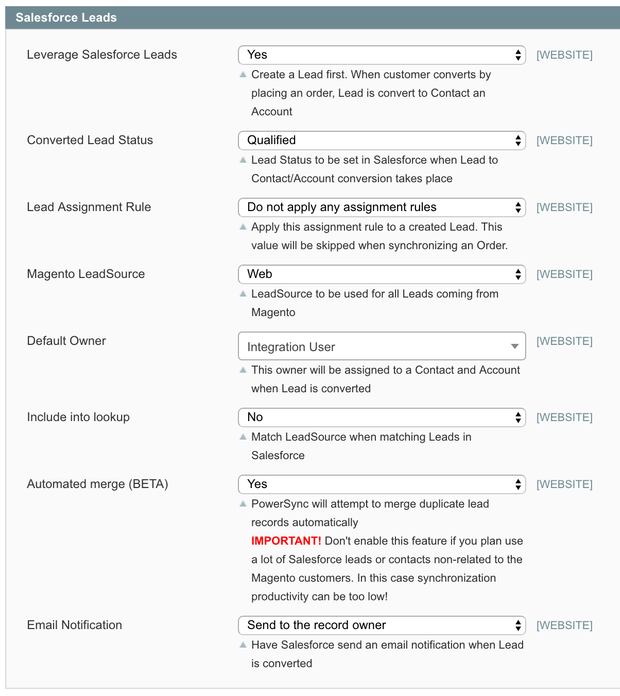
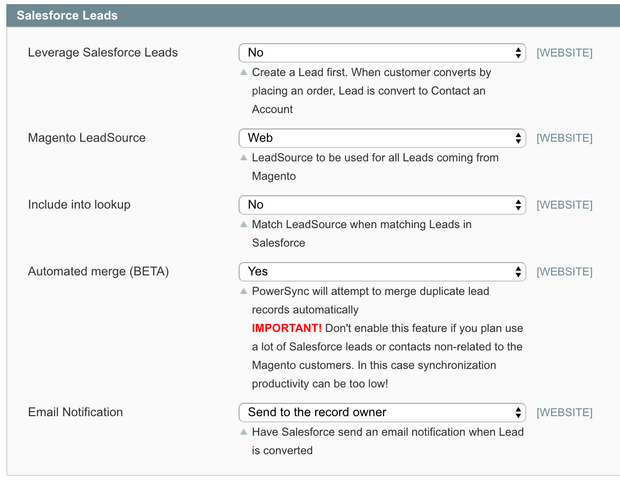
- Leverage Salesforce Leads - If enabled, Magento will first try to create a Magento customer as a Lead in Salesforce. The Lead will automatically be converted into an Account + Contact (or a PersonAccount) upon the first purchase.
- Converted Lead Status - By default its set to "Qualified", but if you use custom Statuses, you may need to change this setting.
- Lead Assignment Rule - Allows you to choose an assignment rule to be applied to the new Lead you create from Magento.
- Magento Lead Source - Lead Source value in Salesforce for all customers coming from your website.
- Default Owner - is an active Salesforce user who will be assigned to a newly created Salesforce Lead when Magento customer is synchronized and if that same customer does NOT exist in Salesforce.
- Include into lookup - Advanced setting to help with Lead filtration.
- Automated merge - Allow PowerSync connector to automatically merge Salesforce Leads based on the email address (case-insensitive)
- Email Notification - Used to tell Salesforce who to notify when the Lead gets converted in Salesforce.
STEP 5: Newsletter Subscribers
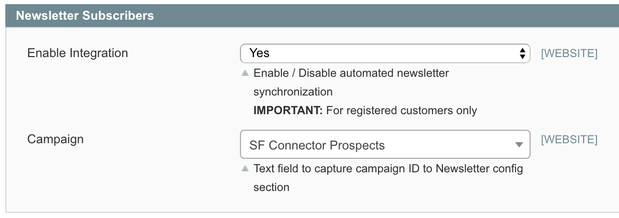
- Enable Integration - tracks newsletter subscription status with Salesforce Lead, PersonAccount, or Contact.
- Campaign - Default Salesforce campaign to assign the person when they sign up for your newsletter.
STEP 6: Customer Dashboard
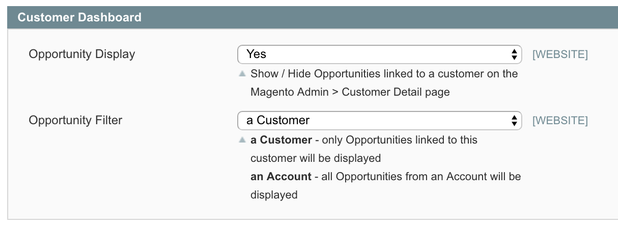
- Opportunity Display - list all Salesforce Opportunities assigned to Magento customer. The list of Salesforce Opportunities will only be visible in the Magento Admin Portal.
- Opportunity Filter
- a Customer - All Opportunities assigned to the Contact in Salesforce.
- an Account - All Opportunities assigned to an entire Account in Salesforce.
STEP 7: Wishlists
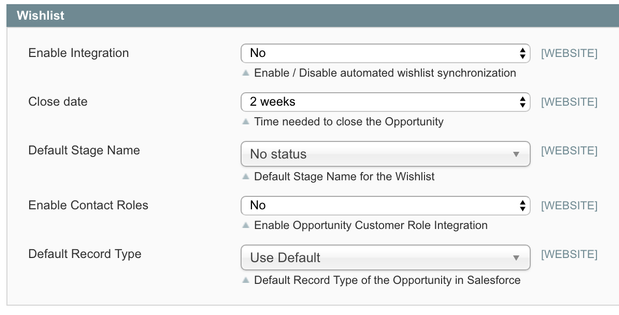
- Enable Integration - Controls if PowerSync should capture customer wishlists in Salesforce in a form of an Opportunity.
- Close Date - time needed to close the Wishlist Opportunity.
- Default Stage Name - Stage Name for the Wishlist Opportunity when the Wishlist is first created.
- Enable Contact Roles - allows associating a Contact to the Wishlist Opportunity.
- Default Role - usually is a "Decision Maker".
- Default Record Type - you can create a custom record type for the Wishlist Opportunity in Salesforce.
, multiple selections available,
Related content
Customers synchronization
Customers synchronization
More like this
Customer Groups synchronization
Customer Groups synchronization
More like this
Contacts to Multiple Accounts
Contacts to Multiple Accounts
More like this
B2B & B2C Account Configuration
B2B & B2C Account Configuration
More like this
Create a new Company SF -> M (With Addressbook modules)
Create a new Company SF -> M (With Addressbook modules)
More like this
Account Lookup (B2C PersonAccount)
Account Lookup (B2C PersonAccount)
More like this