Magento 1: Installation
Thank you for choosing PowerSync! This guide will walk you through and help you install our connector in your environment so you can start synchronizing Magento data with Salesforce today!
STEP 1: Installing Salesforce Managed Packages
See Installing & Upgrading Salesforce Managed Packages for instructions.
STEP 2: Creating Price Book(s)
Our connector requires a custom PriceBook to be used for each Magento Website you have.
In main navigation
- click on "+" (tab)
- click on "Price Books"
- This page will list all PriceBooks you have in your Salesforce Org. Click "New" button.
- Fill our the Price Book Name field (we recommend this name to match your Magento Website Name)
Example: shop.mydomain.com - Check the "Active" checkbox.
- Skip everything else and click "Save".
- NOTE: if you are creating multiple Price Books for multiple Magento Websites, repeat steps 3 through 6 in this list
STEP 3: Generating Enterprise WSDL File
See Generating the WSDL file for details. After you downloaded the file onto your computer, save it and we will need this file later.
We recommend using a naming convention for your WSDL files to match your environments. Each separate Magento installation will require its own WSDL file and must be connected to a separate Salesforce Org.
File Name Examples:
- mywebsite.com.wsdl.xml
- qa.mywebsite.com.wsdl.xml
- test.mywebsite.com.wsdl.xml
- dev.mywebsite.com.wsdl.xml
STEP 4: Installing Magento Extension
After you place the order through our website, you will get a link to download the latest version of our Magento extension. It will be in a TGZ format.
There are various ways to install downloaded file:
- Recommended: You can unpack the file manually and add it to your version control system. Then use your CI/CD pipeline to deploy the new code into your environment.
- You can use Magento Connect to install the TGZ file
- You can Manually unpack the file and FTP/SFTP the extension into the server
- You can SSH the TGZ file into the server and unpack it into the Magento root folder
STEP 5: Upload the WSDL File
The easiest way is to get your file into the environment is by using our UI. After you log into Magento Admin Panel
- Navigate to "Salesforce (tab) > Integration Setup > API Configuration (page)"
- Open "General section and you will see the "Browse" button
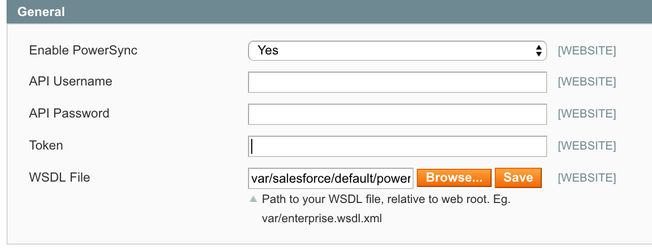
- Click "Browse", find the WSDL file you saved in STEP 2 above, and select it.
- Click "Save" button to upload the file to Magento environment.
We highly encourage you to manage and deploy your WSDL files via a version control and a CI/CD pipeline.
STEP 6: Configure CRON Jobs
See Interval Based Synchronization for instructions.
STEP 7: Configure Magento to Push Data to Salesforce
See Configuring M1 Extension for instructions.
STEP 8: Configure Salesforce to Push Data to Magento (optional)
See Salesforce To Magento Integration Setup for instruction.
Magento 2 instruction is available here: Salesforce to Magento 2 sync setup